
We have decided we need a shipping container to store the stuff we have and will get for the fireworks show (including the fireworks prior to the show.) We can also use it to store our targets and clay target throwers for our shooting sports.
THE CONTAINER:
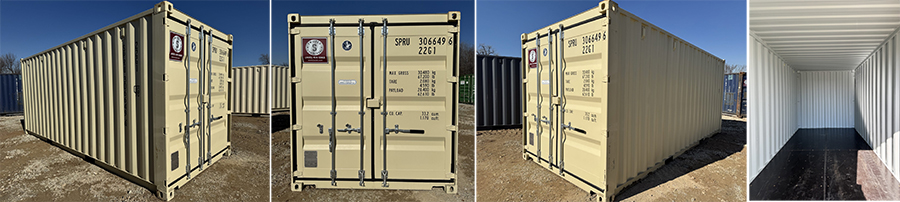
A CONEX box is a standardized, durable, and versatile cargo container commonly used for shipping, storage, and even repurposed into offices or living spaces. “CONEX” stands for “Container, Express”. Originally developed during the Korean War to transport supplies efficiently, it became the foundation for modern intermodal shipping containers.
A standard 20′ shipping container has the following dimensions:
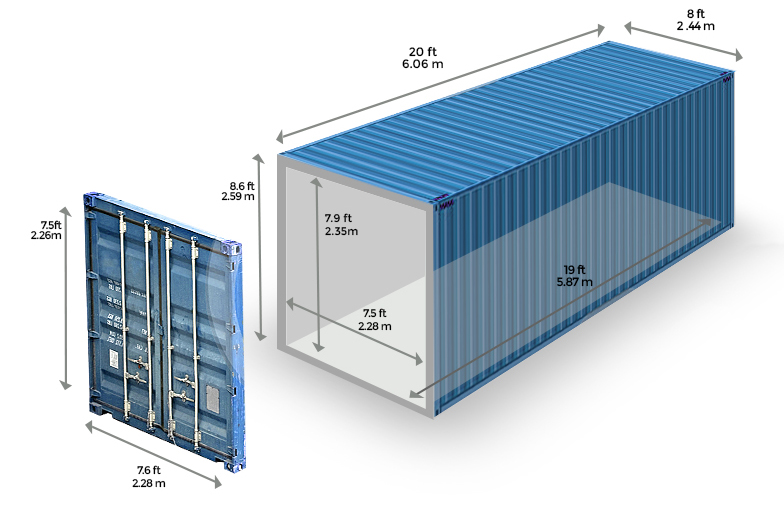
External Length 19ft 10½”
External Width 8ft
External Height 8ft 6″
Internal Length 19ft 4″
Internal Width 7ft 8″
Internal Height 7ft 10″
Container Door Opening Width 7ft 8″
Container Door Opening Height 7ft 5″
Internal Cubic Capacity 1,170 cu feet
Tare Weight 4,780lbs
Net Load Weight 62,420lbs
Maximum Gross Weight 67,200lbs
Floor Space 150 sq ft
PLACEMENT:
This will be perfect for our needs once it is set in place on a suitable foundation. There are several options:
A concrete pad is the best permanent solution.
Pros: permanent, done right will stay level and flat making door operation consistent over time, clean.
Cons: time to install and expense.
The next best option is solid concrete cap blocks under each corner. This is the preferred choice of our supplier, Twisted S Containers.
Pros: inexpensive and easy to install, remove, or move.
Cons: can become unlevel over time if one corner sinks differently than others, leaves unfinished ground under container. (Possible solution is to put down landscape fabric and cover with gravel under container.)
Farther down the list is wood blocking or landscape timber under each end.
Pros: same as blocks, easy and less expensive.
Cons: same as blocks, plus they will degrade over time and have to be replaced.
I think we are going to go with the middle option including the landscape fabric and gravel and adding weight distribution pads to prevent point loading from cracking the concrete blocks.
ENVIRONMENT:
The interior of a unimproved metal storage container in Oklahoma will be freezing in the winter and can easily range between between 100 and 135° F, with the potential to get as hot as 145° F. While we have no intention of storing anything that will be harmed by freezing, the heat is another matter. Venting can greatly reduce the heat in summer. The storage box we are getting has cross ventilation but we will add a turbine vent on the roof and larger intake vents at the bottoms of the doors to move more air.
POWER & LIGHTS:
Another consideration is electricity. Again, we can live without lights and an electrical outlet, but they might be really nice. Since we are locating the storage container too far from our other powered buildings to run power to it, we will rely on solar, batteries, and an inverter.
For lights we found a video of this guy on YouTube who came up with a cool way to install LED lights using yardsticks (we’re thinking this) and magnets (we plan to dip them in this).
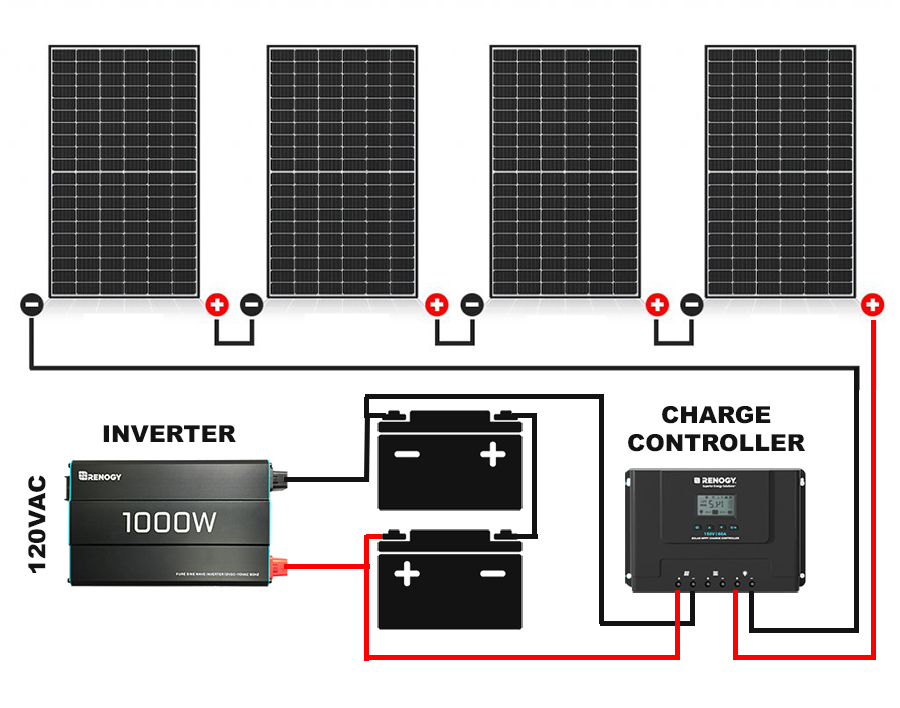
For the power we will probably go with Renogy, using (4) of their 100W Solar Panels (wired in series), a Rover Lite Charge Controller, a 2000W 24V Inverter, and (2) 12V 100Ah LiFePO4 Batteries (wired in series.) Again, we found a guy on YouTube that used magnets (again dipped in this), Zclips, some nylon lock nuts, and a plastic putty knife to mount his solar panels, saving him (and now us) from drilling holes in the roof of the container.
Figuring out the complexities of a solar charging and inverter system can be a little daunting. The easiest way to think of things is using POWER which is measured in Watts (W). The other two components of the energy equation are CURRENT (measure in Amps, A) and POTENTIAL (measure in Volts, V), with Watts = Amps x Volts.
So, starting with the SOLAR PANELS, we can get 400 Watts of power from (4) 100W solar panels. They are called 12 VDC (DC being direct current, like a battery) but they actually run at around 20 VDC in full sun. If we connect them in parallel (all the positives combined and all the negatives combined) then we will have 20 VDC x 20 A (5 from each panel) = 400 W. If we connect them in series (first negative connected to next positive and so on) we will have 80 VDC (20 from each panel) x 5 A = 400 W. Parallel adds the current, series adds the voltage. If you have a charge controller that can handle higher voltages, less current means less loss and heat in the wires (there is a reason that power lines are HIGH voltage.)
The CHARGE CONTROLLER manages the power from the solar panels and feeds it to the batteries at the correct voltage and current to properly and safely charge them. The charge controller must be designed for the battery type being used as different battery technologies use different methods of charging and conditioning.
You determine your battery size (in Amp Hours, Ah) by adding up your loads, factoring in the loss in conversion, and deciding how long you want to run. In our case, the lights we want to use are 20W each and we will use (6) so thats 120W. A 100Ah 12V battery produces 100Ah x 12V = 1200 Watt Hours (Wh). So our 120W light setup would run for 10 hours (if there was no loss.) Realistically, there is as much as 15% loss, so it would be more like 8.5 hours.
Additionally, the same voltage and current things apply here. So we can run (2) 100Ah 12V batteries in parallel for 200Ah x 12V = 2400Wh, or we can run them in series for 100Ah x 24V = 2400Wh. There are some reasons you may need higher current, but generally speaking you get less loss and lower heat with higher voltages and lower current.
Finally, the INVERTER changes the Direct Current (battery) to Alternating Current (the outlets in your house.) Our 2000W inverter will supply 120VAC. 2000W divided by 120V = 16.6 A (about what a single outlet in your house is.) Our lights take about 1 A, so we will have plenty of current.
MISC:
Finally, we will want some shelves for storage and a work bench to use for shooting set up.
Will post pics of construction and finished installation as project moves along…